
This post is an incredibly detailed guide, step by step, for how to apply for an Indian visa from USA for US citizens. I have applied myself and taken notes and screenshots of every step of the way. You don’t find a more detailed guide than this online. If you are from the UK, check out my article on how to apply for an Indian visa for UK citizens where my English boyfriend documented another detailed step by step guide. This post is updated often to stay up to date.
This complicated paper visa application is if you coming to India and want a visa longer than one year. If you are going for less, you need an e-visa which is valid up to one year. Disregard everything below if you only need a one year visa or less and go to this blog post which tells you everything you need to know about the e-visa application process.
PS: If you are planning an epic trip to India, you need to download my India Guide which will guarantee that! Read more about it and get a copy here.
How to Apply for Indian Tourist Visa from USA for a Long-Term Visa – Step by Step guide
Everything is being outsourced to Cox and King. Any questions I had while writing this, I called up Cox and King to get the answers so that all information is correct.
This is a step by step guide on how to apply for Indian tourist Visa from USA. Again, you can check the post about how to get a visa for India from the UK on this post.
How to Apply for Indian Tourist Visa from USA
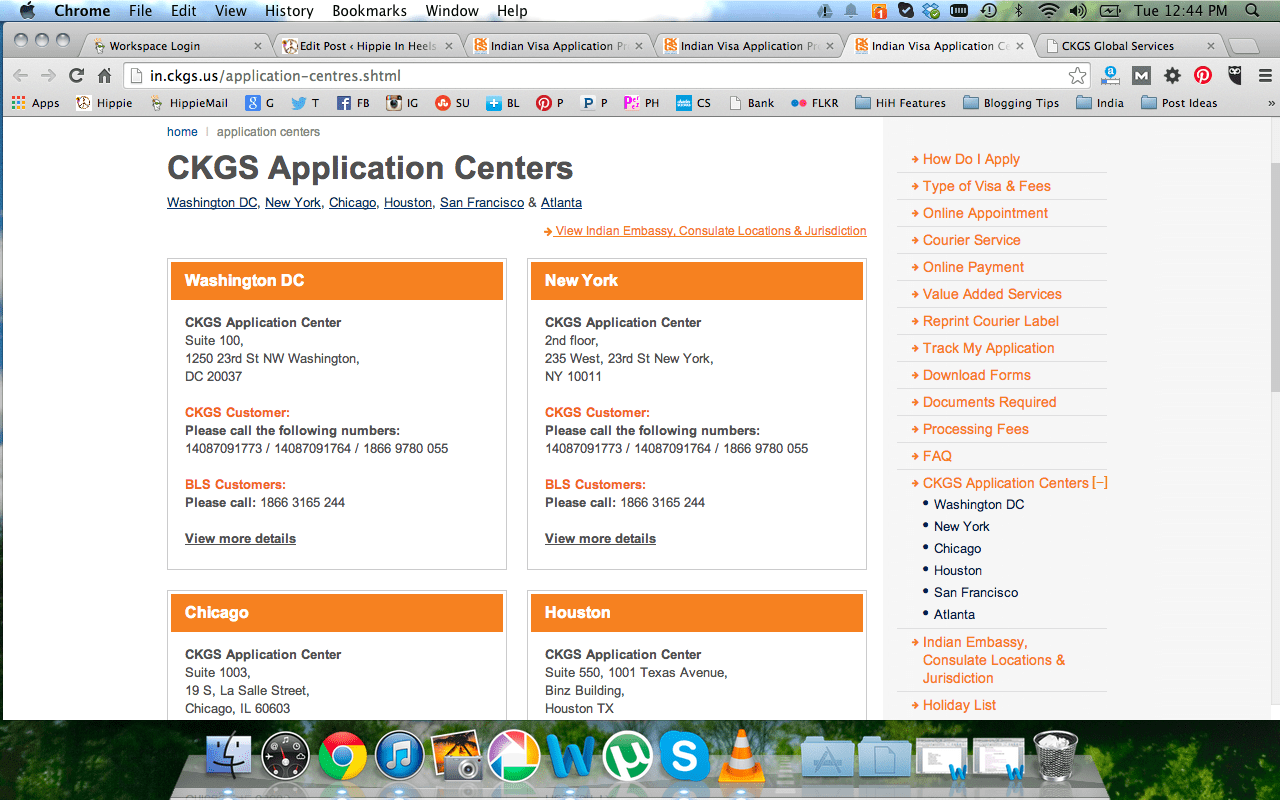
Step 1. Start at the India Visa Center for Cox and King website to see what type of visa you need. I’m only discussing tourist visas in this post, so be sure that’s the type you’ll want. [If you need a visa type other than tourist, you still do all these steps but will have more questions and more forms to fill out]. Next, under “visa” in the top left dropbox, click “visa application – get started”. You’ll then fill in the page that pops up with some initial information. This is the easy part! You will be told your “mission” here based on the state you input. Remember this! For Ohio, mine was New York. Also, you’ll get a “temporary application ID”. You need to write this down and keep it. At the end of the form when you review everything, it will ask if it’s all correct. Once you say YES, you cannot change anything later. You will have to start over on a new form.
Step 2. Make sure your passport is okay for use: “Original, signed passport valid for 6 months from day of application, and with at least two blank visa pages for Indian visa stamps. Amendment pages are not acceptable for visa stamps.”
Step 3. Start the application paperwork that redirects to the Indian site. It is “step 2” and Cox and King automatically takes you here after you save your initial information on Cox and King. You will be redirected to the Indian website for this part. It will ask if this is okay, say “yes”. Click the big orange button that says “click here”. You must fill out the parts for step 2, then come back to Cox and King right after: “You must return to the CKGS website within 1 and a half hour otherwise your Current Session will expire and you will have to fill in the Government Application form again.”
Another page will pop up which is the actual application, as I just mentioned. You want to click the orange button that says “regular visa application”.
Fill out the information very carefully. Once you go to page two of this form, a NEW application ID will come up. This is not the same as your original temporary application ID. You NEED to save this. It’s very important. I will now talk a bit about the questions asked on the India visa form.
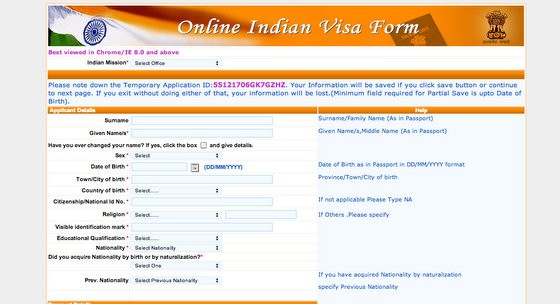
Step 4. At the very top is a “select missions office”. You were told this in step 1 but if you forget, you can go to find your jurisdiction by clicking this link. See which state you apply from is correlated to which embassy. For example, Ohio is to send documents to New York. So on your application over temporary ID select USA: NY.
These following steps walk you through how to fill out the India visa application on their website, although they change it every few months and you may see some different ordering of the questions. It’s the same gist, though!
Step 5. While filling out this application, refer to FAQ About the Visa Application form and read number 9. It starts with how many months should I enter if I go only two weeks? Note from C&K: “If the applicant has a middle name, it needs to be written as the “Given name” in the online application and it MUST match up with the name in the passport.” Lastly, on that page it will ask if you have another passport and once you click “no” if you don’t, the other questions will disappear and you’ll copy the captcha “access” code and click “Save and Continue”.
Step 6. Fill out page 2 with your address (click box for “same” if permanent and present are same), parents details, etc until it’s finished and refer to those FAQ for any section you are unsure of.
Step 7. Click save and continue and move on to page 3. Type of visa: tourist visa. Places to visit, just say the cities in India you are interested in, whatever fits in the box. Duration of visa in months: 6 (is what I’ve always done, but they do offer more now). The number of entries: multiple (this is for backpackers who may cross over to Nepal or something. You could pick single entry if you KNOW 100% you are going into India one time only in that 6 months.) Purpose: Tourism. Next when you’re flying there and what airport you plan to fly into. The middle parts are easy, then at the end you put your contact person in India. You can put a hotel, but put an accurate address. If you don’t have anywhere planned to stay, find a hotel online and enter something. If you are visiting a friend, put their information. Lastly, a reference to a friend in America that can vouch you’re not a terrorist.
* Remember the date issued STARTS the 6 months you have in India, not the date you arrive in India. Also, it says to make sure you put your e-mail and cell phone number, which should be in the application form.
Step 8. Upload photo. I had issues with this (shocking, I know) but it did work after two tries. Later, you will glue your same printed 2×2 on the application. When you click save and continue, it takes you to the page of “is everything correct?” This is that last chance to make changes or you have to do the WHOLE thing over if you notice something after printing. Check and double check then verify and continue. Now print it. It should also show you a FILE NUMBER/ Reference ID / Application number. This is not the same as the temporary ID and needs to also be written down and kept in case you need to print another copy of this later. Note from C&K: “Please make sure that the Application Form prints completely with the port of entry and exit completely printed at the bottom as well as the bar code.”
Step 9. Be sure to sign on BOTH PAGES: Under the photo on the first page, and at the bottom of the second page. Other than the signature do NOT write on the application. Do NOT make handwritten changes on the application or it will not be accepted, so the website says.
Step 10. Attach your 2×2 photo on glossy paper with a white background and no glasses to the designated spot. Use paper clips or glue but do NOT staple. Your face should be in 80% of the frame.
Step 11. Gather your proof of residence document & any other you need. Here is a list of documents needed via Cox and King; at the top select “tourist visa”. It will show you a list of everything you need to include in your packet and actually walk your through filling out the forms. It will take you through the “additional particulars form” and show you the rest of what you need to send and fill in, like the “Religious undertaking letter”. Always print each form it prompts you to fill out. For proof of residence (if you need it) Here is what they call proof: “State Issued Identity cards i.e. Valid driving license, Utility Bills for water, Gas, Electric, Sewage, copy of valid lease, with signature of Landlord AND tenant to be provided. Do not cut any document to smaller size like Driving size, passport copy. Utility bill must be from last 90 days.” Here are some documents which they will NOT take: Cell phone bill, credit card Statement, bank Statement, cable bill, insurance forms, any address with a P.O. Box. A commenter added that if you send a photocopy of your driver’s license- they want it in COLOR.
Step 12. If you are a minor (under 18) refer back to the FAQ’s on the documents page (from step 3 on the website), which adds a few extra documents.Applicants who have dual citizenship with the US and another country must apply on their US passport, if living in the US except for applicants who hold dual citizenship with Pakistan. Pakistani citizens who have also acquired US citizenship must apply for a visa on their Pakistani passport only. If the applicant is a student, retired, self-employed / freelancer or house-wife, bank statement for the last three months is required to be submitted.
Step 13. Payment. Again, it will redirect you here. You will choose your shipping options. You can easily pay by a USA card. There is only one order form per applicant allowed, so if you are sending two passports, you fill out two of these forms. For shipping, your shipping address MUST be the same address as your permanent address listed in the application, or it will be denied.
NOTE!! I talked on the phone to a Cox & King rep who confirmed EACH person MUST pay $15 even if two, three, or four passports come in together, all of them must pay $15 each to get their passports sent back. They must be sent separately and have their own barcodes.
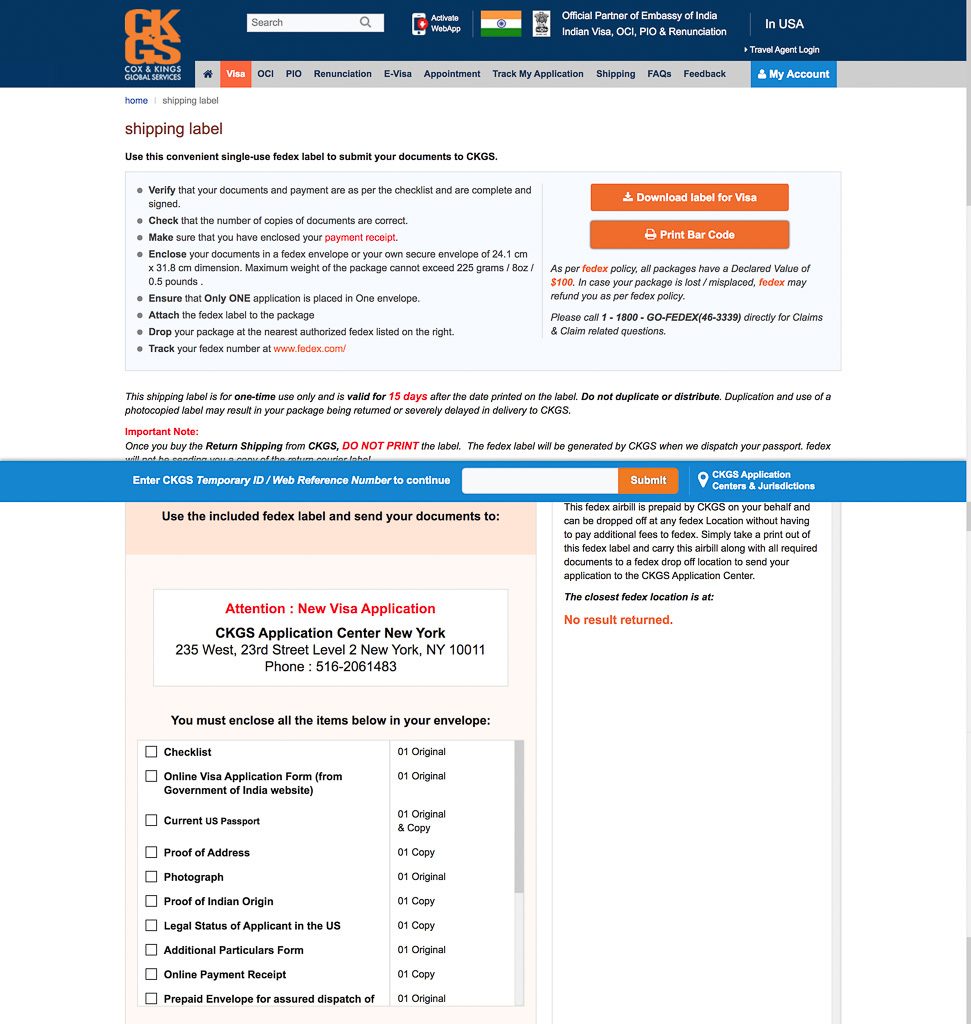
Step 14. Once you’ve paid, you MUST print and send a copy of that payment receipt with your bundle of visa documents. It will now populate a list of everything you need to send – although you can also use your new “application ID” to login to your account and re-print any forms you forgot. You must print your shipping label and a barcode which will be pasted to the FedEx envelope.
Step 15. Gather all the documents for the parcel to be sent out. So far you have your application with photo and signatures, your proof of residency, your order form, your additional particulars form, your PASSPORT, a copy of the payment receipt, the visa checklist, and your courier service form. Double check the address for your jurisdiction and paste the address on the front. Note on address writing: “At this time all CKGS Application Center, USA locations, are unable to use manual hand written labels from any courier. Please provide a computer generated label from the courier website or retail store with your postal application.” If you need to reprint the label, enter the requested information or you can ask FedEx to make you a label at a fee. The address you return the passports to must be the same address you use for proof of residency.
Tips: when you ship your package from FedEx make sure the envelope has a plastic seal so rain or snow doesn’t ruin your documents and separate the packets within the envelope for different applicants applying together. I did the overnight option, but I’ve also done the airway bill option (cheaper but more work).
Step 16. IF YOU DO NOT PAY $15, Put inside the package a pre-paid self address traceable envelope and airbill.
A note on sending more than one at a time: “If there is a group / family of four applicants and applying for the same service (only Visa or only OCI) applicants can send 1 prepaid return envelope but if they are applying for different services then they need to send different return prepaid envelopes. In 1 envelope we can send only 4 passports; if there are more than four passports we require separate envelopes.” If you are a family of four needed the same type of visa you can send them together with one envelope for them to be sent back in.
Step 17. IF YOU DO NOT PAY $15, It’s a FedEx airbill you need if you think you can get it returned cheaper than $15 or if it makes sense because you have multiple passports. If you go into the shop they will help you. Here is a note from the folks at Cox and King about your airbill: “Applicants must not provide a handwritten or manual FedEX air bill. Airbills with credit card information, handwritten airbills or blank airbills with information typed in cannot be used by CKGS office. All such passports will be held back in CKGS office and may lead to delays. CKGS strongly recommends using a traceable airbill from FedEX. CKGS also recommends that return shipping package is insured.” You CANNOT pay with credit card; I actually set up an account with FedEx and the money was deducted from my bank account, but from what I remember it wasn’t easy and for one passport, $15 is a good price (and half what Travisa charged).
Step 18. On the outside of the envelope, they ask you specify department name. For visa applications, write VISA. Send your package and track it via step 6 on the website. It may take longer as offices are merging and Cox and King is officially taking all other visa companies outsourced applications. According to the Cox and King rep I spoke with, it should take from 5 business days up to two weeks max.
Omg, thank god I’m finally done writing this! Why can’t they make getting a visa easier!? I have to say, the whole system is a nightmare & the people at the call center are confused on what’s right and wrong. Finally, though this post is accurate and up to date! I hope it helps someone.
Now that you have your passport and visa, here are 15 documents you need to take with you abroad. This has nothing to do with the visa, so not to confuse, but it’s photo ID you’ll need abroad, copies of things in case you lose your credit card, etc.
- Disclaimer: The Cox & King site & India Visa regulations change often so make sure that you’ve completed everything per their standards, not the standards of this post. This is only a guide to help not a direct source of Cox and King information. I did call them a couple times to verify things but they are located at a call center in Bombay and nothing they say can be proven! Prepare to be on hold about 20 minutes.
Does all of this seem like too much hassle? If you come to India for less than 60 days, you can get an evisa and avoid this. iVisa charges a fee but takes care of everything for you if going for less than 30 days: click here for iVisa. They have a “zero frustration” policy aka they do everything for you.
Ready for the next step of planning you India trip?
I’ve been in India for over five years and have traveled a huge amount of this country. My blog has over 800 articles with tips on travel, most of them about India. From how to dress to how to book a train and where to stay in every town – it’s all here. I’ll link some tops blog posts to get your trip started as well as resources for planning out more on travel insurance and flights.
- Step by step guide to plan your India trip from scratch
- 100 tips for traveling in India
- You need travel insurance. World Nomads is recommended by Lonely Planet, Nat Geo, and me! You can get a quick quote here. Check out what exactly it covers and doesn’t.
- Budget travels, check out this hostel guide to India here which has top chain hostel brands in India. Otherwise, I love using Agoda to compare different hotels.
- Want a tour? G Adventures is for you!
Pin How to Apply for Indian Tourist Visa from USA for later:


I don’t suppose you happen to know where it is best to get a 2nd tourist visa from do you? My boyfriend is on a tourist visa (Double entry as they wouldn’t give him multiple, even though he requested it) and will need to leave India for a new one in December. We’ve heard that some of the neighbouring countries may refuse the request. Have you heard anything?
You know, I am not sure anymore because it keeps changing but from my experience, only with business can you go to neighboring countries because you have to leave every 6 months even on a long term visa.. but I think with a tourist visa you have to go to your home country to get a new one & you USED to have to wait 6 months, then 2 months to go back.. but now you can go back right away.
Hi Rachel,
thanks for all the information. You have been really helpful for first timers like me. I am currently travelling in Malaysia and will be going to Sri lanka in Dec and from there applying for an Indian visa in Colombo and fly from there to Thivupuram. In your experience, have Indian immigration ever asked you to show an onward ticket or return ticket? You see, I plan to take my own sweet time over the 6 months and don’t know when or where I will be flying out from. I have been through SE Asia, and have always fly one-way, and then workout where my next destination will be, without locking myself into a fixed time or route . Thanks.
I’ve never been asked to show a return ticket although that could be something new. I entered last in June.
I just got finished with ours and travisa is no longer used since May 2014. (It is now outsourced to: http://www.in.ckgs.us/ if you want to change it on your blog entry… This company is WAY better & easier application steps to follow. ALSO another clarity: IF your drivers license has your permanent HOME address – that is also connected to your passport and what you will be placing on your application. You will submit a color copy of your State Drivers License. There is no need for an utility bill. I called them ;) TWICE lol. IF you have a PO BOX on your drivers license, then you will need to provide the additional forms of identification.
https://www.indianembassy.org/pages.php?id=18
Hi Arykah, I am on it :) thank you for your help! Travisa is outsourcing & it will take longer to go through them. I’ve updated the post to explain !
And maybe they just don’t care at the VISA office…depending on who looks at your application…but better be safe than have to resubmit…They were so strict when I did Italian Visa. At least with India you don’t have to show them $$$ – especially the requirement of huge amount $ per month per stay in your acct.
If you do have to use an extra form of identification. They only allow bills for Land Lines, not Cellular phones. That would be frustrating, but at least you can get a landline hooked up in an instant & they cost less than $17.
Before I called Cox & Kings, that was my only other option , cuz my water bill is sent to my rental and I use my parents owned home for important business.
Sheesh! It seems like getting into India is a bit more difficult than some other countries. Thanks for the thorough directions. I will def need them when we decide to travel there!
Yeah, they don’t explain it that easily when you read through the site the first (few reads) so since I needed to explain to my parents it was the kick in the butt I needed to just go ahead and write this post.
Man, I wish I had a step-by-step for the visas I’m going to need this year! This is an awesome guide and should be a part of that e-book you’re making :)
maybe some googling will find you one- I know the India one I searched for and couldn’t find… you’re right I should get on the e-book.. ahhh!
I may have missed it on your post, but how long is the tourist visa good for? When my mom went to India, she applied for her visa directly at the Indian consulate in Atlanta. She thought it was crazy that she had an appointment, yet when she got there she just took a number and had to wait with everyone else. So I guess if you go to the consulate, just show up without an appointment!
for US citizens it’s good for 6 months- and that’s crazy about your mom having to wait even with an appointment! Happens to me in India all the time though :/
Let’s say you are over 18, living at your parents house temporarily and you don’t have a utility bill, do they accept any bill with your name and address or not?
You need something that proves their house is your residence, I think in that case what you would send is a bank statement for example that comes to that house with YOUR name on it, or your drivers license, I think there is a link for what all they would take- perhaps your cell phone bill has your name included even in a family plan.
Hi, I live in the UK and travel to India regularly, I’ve recently jumped through hoops to obtain a 2 year tourist visa to then be told by a Non Resident Indian I met at Delhi airport that from October, UK citizens will be able to obtain a visa on entry—worth checking before you go through the visa process for those in the UK! Must also say I really enjoy your blogs
Hi Jen, Yes they do want to make visas available on arrival and I hope it happens soon but they’ve been saying it for a while and changing dates over and over so it’s just not reliable if you want to make a trip in the next 6-9 months I’d say. There are some places approved but sadly not US and UK :/
I thought you may want to know that lately it’s been taking extra long to get visas. The new company the Indian Embassy has a contract with is Cox and Kings, Travisa is a 3rd party that has to go through Cox and Kings as well and only is able to submit visas on certain days so it’s actually best to go straight through Cox and Kings if you don’t have a few months. Here is the link for the online application (all applications must be completed online) http://indianvisaonline.gov.in/visa/ It also looks like it’s less expensive this way since the service fee is $17 vs. $70. I hope this helps!
Hi Alison! Yes , thank god for you great readers! I haven’t applied in ages and called travisa to check for changes to be told that now you don’t need an ID number.. hmm lol they could have mentioned the outsource :) I added an update in the post to send people over & will have to do another post with steps ahh lol
It’s nice to have all this information in one place! I have heard a lot of gripes about applying for visas to India. Thanks for sharing.
Thanks, I still have a few questions for them myself and plan to call today when they open! Lots of links on their site lead to 404’s which is SO annoying!
I just had to smile reading this after applying for a residence VISA in Spain just a few weeks ago. What a pain…special notaries, translations by specific authorized people, inconsistent requirements at different consultates, etc. etc. Only a government could make up these kinds of processes!
It is SUCH a pain! So annoying. My parents are working on theirs now and called me saying man they want a lot of stuff!
Omg girl! You are damn good! Thank you so much! THESE are the best instructions out there. I didn’t even have that ridiculous “additional particulars” page, until my voice told me to go on your webpage and do a double scan checklist!!! This is the most unorganized mess of a Visa I have ever applied for in my life. lol
Hi Arykah! I’m glad it helped, do check the real site and make sure I didn’t miss anything- I did my best but who knows if something slipped by. I’m glad you saw the additional page before it was too late. I’m helping my parents apply now and it is a mess!
Hi Rachel!
I love your website! It’s so helpful!
I just tried (several times) to use the Cox website and it doesn’t appear to be working. I fill out the first page of the “Online Indian Visa Form” (with the orange banner), and then it returns me to the Government of India Webpage. Very frustrating! Who did you call? Can I apply over the phone? Thank you!
That’s so strange! I think the number I used was the 800 number but can’t exactly remember- it redirected me back to India lol to a call center and I had to call multiple times to get any good info as they all said different things. You can’t apply over phone but can go in person to the places listed as offices
Can you tell us more about this? I’d want to find
out some additional information.
I had a question about the Courier Service, I don’t see a place to order that online. How do you go about that?
Sorry, I am having major difficulties with the Courier Service part. Can you explain how you got to that to go?
Hi Matt, so with the courier bit, I can’t go in and check it out because you have to put in a confirmation number which I don’t have. My parents just applied and said that part was weird but they just paid the return one, and at the post office had the office print off the label to send. It was returned 2 weeks later. What is your question in particular and I can ask my mom and dad the details
Thanks for writing this, it is very confusing and their websites do not work well at all.
I too am having issues with the Courier service bit. In the payment form it seems $95 is correct, with $15 for the Fedex return. However, it also says you have to to fill out the Courier online form, which costs $15.40 to fill out. Do you need to do/pay both, or is it one or the other?
I did pay online, but the website did not resolve and give me a confirmation number, so I couldn’t print it. The payment did go through though on my credit card. I’m awaiting a response from CKGS on what to do!
I’m so sorry that I can’t help on this, without the reference numbers I can’t even get to this part of the form. I know my parents paid only the 95 and 15… they also had nothign print off and just went to fedex and had a label printed. I would call the office!
Hi Stephen – just went through this today, and the courier service was extremely confusing. EITHER you can check the box on the order form for $15 and include that in your money order for a total of $95, and ship it to the visa office yourself, or you can do Step 18 (“On your initial page (link again, if you forget) we are on to the website’s step 5. Click courier/ return courier service. This new courier service page pops up.” and fill out the online order form for courier service (use the Fedex option). We did step 18 and it’s not great – you have to pay for both pickup and return service together with a small service charge (total of $30.90) and then call Fedex to schedule the pickup for a 4-hour window, but that is not disclosed in any instructions. If you can do the first option and drop off the package yourself you’ll save yourself the automated Fedex phone system and waiting around for the pickup, and having to fill out the courier service form from step 18.
Hope this helps!
Thank you for explaining that Alice!!
RJ,
Very helpful and informative syte………yes, you Rock.
I am traveling US/INDIA and keep running into, ’round trip ticket necessary’, is this true?
Set in stone, or is a one way good enuff?
Thanx
Hi Greg, this may be something new. But as of June, I entered Goa without a return ticket.
Hi Rachel, you did a great service posting this detailed dyi. Thank you very much. I have a question. When I am trying generate a courier form the drop down menu doesn’t list my township and so doesn’t allow to any further. Any suggestion how to resolve it or you suggest just go to Fedex and generate an airbill and enclose it in the mailing of all documents. Also would a passport page with address will serve as proof of home address?
Hmmm, I think it’s best you call in and ask b/c I’m just not sure! Might do an airbill to be safe. I don’t think passport page counts because it could change over time.
Nurse Jones,
With a multiple entry visa when I re-enter India for free, or is there a fee.
Thanx,
M
……..read that as > will I re-enter India for free<
there is no fee!
Hey Rachel, Thanks for this. Excellent summary of process. One question. In one of the latter documents there is a line that says include 2 postal steps. What is this postal steps form? Is this the courier form? And if so, if I include paid for shipping and envelope does it become unnecessary? Also curious about your living experience in India. Have you ever considered getting citizenship there? Would that be really hard? Have you been to Puttaparthi? Thanks very much, Paul
Hi Paul, It’s been a bit since I did the visa research and I can’t remember the details anymore past what I’ve written sorry! I would call the hotline. Foreigners can’t get citizenship in India unless they’ve been here like 30 years or get married, but I have 5 years for now. Haven’t been to Puttaparthi.
THANK YOU for this article! I am in the middle of filling my visa out now and this is SO helpful!! :)
your welcome!
Phew! My on-line Tourist Visa on Arrival (TVoA) was just successfully paid for($62) and received in India. It will take 72 hours to process. Hopefully, I will receive, via email, my Electronic Travel Authorization (ETA) that is valid for (starts on arrival)30 days. It is also restricted to 9 designated entry airports. I am heading in to IGI and am only visiting for three weeks. (https://indianvisaonline.gov.in/visa/tvoa.html)
Tip: I needed the expertise of FedEx Kinkos to re-size to the correct pixels (Photoshop) the passport page PDF and the photo jpeg. The indiatvo@gov.in techs can do it for you too.
This is new and has only been around for a little over a month. Has anyone reported difficulties at immigration on arrival yet?
Wow! In thirteen hours I have had my TVoA processed and my application granted to travel to India. Gotta love those Indian techies!
amazing!!!
What a headache! I’m considering picking a different country. I need a reference in India and don’t have one. I am waiting to hear back on my parents’ friend’s parents in new delhi. One website said I can put a hotel but my plans only extend as far as walking off the plane.
Do you know what to put for “Reference in India”?
And is it safe to book a flight a month from now without visa approval?
It asks for expected arrival date and I want to get the flight before the price goes up higher.
For the reference you can out any hotel that you night book. I’ve never listed a place that I was for sure on and it’s been fine
Your blog has been so helpful as I plan to head to India for a year this fall! Quick question about the visa application process…I was in India a couple years ago for two months and did a lot of traveling around the country. For my new visa application, it asks for a previous address…and I don’t know any of the 5 or so we may have had back in 2013! Any ideas??
hmm I don’t know about this, sorry!
As far as the label goes, I had luck calling the 516 number that comes on the confirmation email and simply asking what to do. The person I talked to said completing the process is supposed to generate an airway bills number which is supposed to arrive in your email (separate from the receipt email) within 24 hours, but they could tell me my number over the phone (I had to give my web reference number [number on the Visa application which starts with USA] and passport number). I asked if you never get the airway bills number are you supposed to just call after a day and request it? The answer was, “Yes, that is exactly correct.”
So there you go. To reprint your label, call CKGS with your passport number and web reference number and ask for your airway bills number. Then go to the reprint web page (you can just google CKGS reprint label) and use the airway bills number to generate a PDF of your label, which you can then print.
Thanks for the tips!
Thanks for all the tips. You’re awesome. I’m applying tourist visa for my daughter. I just completed all my paperwork and bought the CKGS courier return service.
Question:
Can you please explain in detail on what exactly should I do to send the completed Visa documents to CKGS ?
1.The site’s instructions are so confusing. Should I buy the FedEx Envelope, print the label and stick it on the envelope and send it ?
2. If yes, which label should I print out and how do I get it ?
I do have the receipt of payment and I presume that I don’t have to worry about return of passport as I bought the return service.
3. I should be sending the original passport of my daughter along with a copy for visa stamp, correct ?
I agree they are confusing, I haven’t applied now for some time and can’t remember all the details so unfortunately what I have in this post is all I know at this time. and for #3 yes you need to send original passport, i can’t remember about a copy.
Maybe I’m the only one confused about this part. :-/
The top of the checklist reads “2 copies for walk-in and 1 copy for postal applicants of signed checklist with the boxes ticked must be submitted with your documents”
Then, in the actual checklist itself, it reads, “2 copies of checklist – to be printed, ticked, and signed”
Do you know if I should submit 1 or 2 copies of the checklist?
Should 1 or both copies be ticked? Should I tick them or is the embassy going to tick the checklist?
Also, nowhere on the checklist is there a place to sign…?
Do you remember what you did for this part?
Hi Alyssa, it’s been too long now since I’ve done it that I don’t remember the details myself. I think it’s always better to send extra then come up short though.
Did it really take 30 days for Visa approval or should I expect it to take longer?
It took mine a week
Hello Rachel, I am from Colombia. I will go to India next month. I am trying to get the 30 day visa but after spending a LONG time at the government website, it does not take my credit card. Do you have tips on this process?
Thanks!
You can use ivisa.com and pay a fee to have them sort the whole thing out!
Hey Rachel, not sure if you’ll be able to help me out with this one… but doesn’t hurt to ask. My “permanent address” is a po box in ky , i use it to file my taxes, everything. but i live in alaska, and theres a po box on my alaskan drivers license. (which is basically the only document i could use for proof of residence)
I’m not sure which address to use for what, and in turn, what mission I would pick depends on that as well.
Not sure who I should ask to answer questions like these either. and iVisa only does 30 days, i’m looking to get the 10 year multiple entry.
Thanks!
becca
Hi Becca,
Since you’re going for the 10 year you’ll want to have everything in perfect order so I suggest calling to make sure you get it right. I called when I wrote this post so the number must be on their website – definitely double check with them! Although to be honest call twice because sometimes the second person will give you a different answer! So annoying lol
If this helps, when I applied to one visa I lived in Charlotte NC, and the next time Tacoma, WA and my permanent address was always my parents’ in Ohio (as I was a travel nurse) but I know I did the mailing all through my temporary addresses and used those missions.
Thank you so much for writing this. Trying to figure this all out through CKGS has been so confusing, but this makes sense. You rock – much gratitude :)
Hi,
I made a mistake on my previous application but can’t edit it. It says I can’t make new application with same passport number.
How can I cancel my previous one and make a new one?
Thanks a lot!
Hello, I’m sorry but I’m not sure – I haven’t had this issue personally. You’ll need to call them.
This is my issue! Did you get this resolved? I tried calling Cox & King but they’re closed today :(
Thanks so much for all your information. I have printed out, signed and have all my documents ready to send. Is it required to also make an appointment to go into one of the offices? Or do I just mail the documents in and wait to see if it’s all accepted?
You just mail it in with your passport and that’s it! At least it was for me – I have done this 3x and never gone into an office, although I don’t know your nationality etc so this is just what I experienced :)
“I have to say, the whole system is a nightmare & the people at the call center are confused on what’s right and wrong.” GIRL YES. My friend and I got a business (? if I remember correctly) Visa when we went for four months of volunteer work with a friend’s nonprofit and it was TORTURE. It took waaaay longer than the time they claim and we had to deal with extremely rude/unhelpful customer service reps. We eventually had to go in person to the embassy in Chicago in order to make sure things got done properly. The whole thing put us 3 weeks behind schedule.
For anyone reading this: the Cox and Kings website says you are not allowed to apply until 30 days prior to your trip- that is a lie. We were told by multiple reps and managers that we should have applied sooner. I suggest applying ASAP and calling to ensure that it was received. Also, the online tracking system was never up-to-date and left us in the dark. Calling is your best bet for an update.. and remember, don’t take no for an answer! Speak to someone in charge.
Thank you Thank you Thank you for sharing your experiences!! It’s always helpful for others to read about it.
Hi love the advice thank you! I’ve been reading a lot online and have tried to speak to the Indian consulate several times but cant get a straight answer. I’m traveling to goa, Mumbai And Cochin via seaport. Quick 2 week cruise. Evisa says it’s good for Cochin and goa via seaport but I can’t get a clear answer on mumbai. Any pointers? I’d rather get the evisa if it will work in Mumbai to Save a little $ and some paperwork. What do you think? Thanks for your help! From a fellow nurse ~Meghan
Mumbai airport takes evisa but I haven’t ever done a cruise or used the ports, so I’m not sure about that – so sorry!
Whoops!! I just sent you a screenshot with my address. Please don’t submit that to your comment section<3 Ha. If you have a reply to it though could you please just email me tricia.clark911@hotmail.com. Thanks!
Hi Rachel love your blog and India ,I was just wandering if you can give me some advice.if I go to the India embassy in Panama will I get a visa on the same day.thanks Andrew
andrew for less than 60 days u have to apply online no need to go there just open click and apply
https://indianvisaonline.gov.in/evisa/Registration
normally your visa will be grant in 3 to 5 days.
Hi Rachel! So I will be in India for less than 48 hours (more like 36 hours!). I’ve never been to India before and so I am not sure what visa I should apply for. Someone recommended getting a transit visa because I will be there for such a short amount of time. Do you happen to know much about the transit visa and if so, can you direct me to the correct website? Thank you!
Transit Visa is valid for single journey or two journeys. It would be valid for entry within 15 days from date of issue specified by Indian Mission.
Duration of stay during each visit by foreign nationals passing through India should not exceed 3 days.
The applicant should possess confirmed ticket to his destination beyond India.
Required Documents:
Passport with 6 month validity
Passport size photographs
Photo copy of passport
Copy of online Filled form
Confirm air ticket for onward journey
Valid visa for final destination
“you have to fill the online application form then take printout of the filled form and go to any nearest centre with your original doccument and carry atleast two photo copies of all the doccument transit visa is come in regular visa process not in evisa here is the link to fill the form.
https://indianvisaonline.gov.in/visa/Registration
open the link select your country from where u r applying now then select your nationality then select nearest indian mission office then put your mail id dob and select visa type.
great post rachel i read your post am from india and residing in central part and want to tell u now rules are changed and indian visa is so easy visa application in the plañet now they accept only in electronic form and processing so fast and it great u had nice visit here.
Raj – that is not correct. The electronic visa is for stays of under 60 days as my article states. Any longer than that, up to 6 months, you need to mail in a visa. Please don’t reply to people’s comments telling them the wrong info and giving your personal cell # to “help” them – I’ll just delete them as I just did.
yes for more than 60days u have to submit on centre but most common is evisa 95% are taking it. and very less people for other visa types as i talked about only evisa which is very common.
Hi Rachel,
I’m trying to find out if I can get a 10 year Indian visa while I’m in England in the fall, rather than applying for it months ahead of my trip. Do you know if an American citizen can go to the Indian embassy in England and get a 10 year visa? Thank you,
Julie
Hello Rachel, can you tell me if it is possible for an American citizen to get a 10 year Indian visa from the embassy in England? I’ll be traveling in Europe prior to going to India in November. Thank you.
DO NOT apply for an India Visa directly via the India website, unless you like to waste hours and even days of time to go around in circles. I could give a very long description about what my companion encountered, but it’s too long to list here. I sincerely believe that they are a corrupt operation as they will reject with no reasons given (and none that can be imagined as there were no legitimate reasons for rejection) and then only respond with lists of typical reasons for rejection of which none apply. There is no refund of $100 application fee, and only recourse is to re-apply and start over, and pay $100 again. Best thing to do is to not travel to India. Go somewhere else unless you love to spend time with hassles instead of getting things accomplished and enjoying a vacation. Our flights that were scheduled have a layover in Germany. We’ll likely just stay in Germany and catch the one back to the US from there. Best to stay away from India!
Hi, thanks for the helpful article. I am filling out the application for an Indian visa and it asks for national ID number. If I am a U.S. citizen, is this my social security number or passport number?
To get a 10 year tourist visa. Do I fill in the application on line. Wait for reply from cox and King before mailing my passport money order and return envelope
We went to India last October and it was the easiest Visa application we ever had. We were lucky that they’re offering a $25 visa now that’s good for 30 days only. The cheapest option before was $80 for 1yr but 30 days is more than enough for us.
Hi. I’m an American on my second 10-year tourist visa for India, with 4 years left on the current one. One thing I’ve never been clear about is how long I need to wait, if at all, between stays of six months. Normally I don’t stay more than three or four months in one go in one year. But now that I’ve been unable to visit at all so far in 2020 because of pandemic policies, I’m thinking that once India reopens to international visitors that next time I’ll stay a full six months. Then I’ll return to my home in Bangkok and would like to return immediately for another three months in India. I’ve never done that before and nowhere on the Indian visa info websites have I seen any discussions about it. Thanks for any light you can shed.
just few time before, i was also planning for a canada visa from New Delhi India, but didn’t get last year, but this year I got the visa for canada, thanks for the valuable help for my visa :)